• Home
  • About Us
    • Why We Paint- The Tucker Story
    • Testimonials
  • Contact
  • Testimonials
  • Press
  • SHOP FAVORITES
    • Email
    • Facebook
    • Google+
    • Instagram
    • LinkedIn
    • Pinterest
    • RSS
    • Twitter
    • YouTube

Bella Tucker Decorative Finishes

Kitchen Design-Cabinet Refinishing-Nashville TN

  • Bella Tucker Decorative Finishes
  • Blog
  • Kitchen Remodeling & Design
  • Cabinet Painting
    • Cabinet Painting Details
    • Before and After Photos- Painted Cabinets
    • Kitchen Cabinet Refinishing Franklin TN
    • Cabinet Painting Testimonial
  • Paint Color Consultations
  • Design Services
  • Gallery
    • Painted Cabinets & Furniture
    • Stencil Painting
    • Wall Finishes
    • Painted Floors
    • Ceilings
  • Tour Our Home
    • Bella Tucker featured on Apartment Therapy
    • Tour Our Home
    • Tucker House TV Features
    • Vintage Tucker Christmas
    • Christmas House Tour- Tucker Style

How to lighten up your kitchen- a step by step guide

By Dana Tucker 3 Comments

I have literally talked to six customers in the last two weeks that have all said the same thing, “Can you help me lighten up my kitchen?”  In some cases, these kitchens are only 5-6 years old and they have beautiful solid wood stained cabinets. In other cases, like in the house we recently purchased the cabinets need a major update. Everyone wants their kitchens to be light and bright like the current design magazines and blogs. So, I thought I would share with you some of my top tips for updating and lightening a kitchen. Here goes:

  1. Paint your existing cabinets– If you like the layout of your kitchen and the style of your cabinets, you can give them an instant face lift by applying a coat of primer, two coats of paint and a protective top coat. Beware, that this is a very involved DIY project. To do it correctly, you need to remove all the doors, remove the hardware, tape the hinges, paint the base cabinets and use a sprayer to paint and topcoat the doors outside so you don’t see brush marks. It will take most DIY-ers 3-4 weeks of nights and weekends to complete this project. But, the results will be AHmazing.
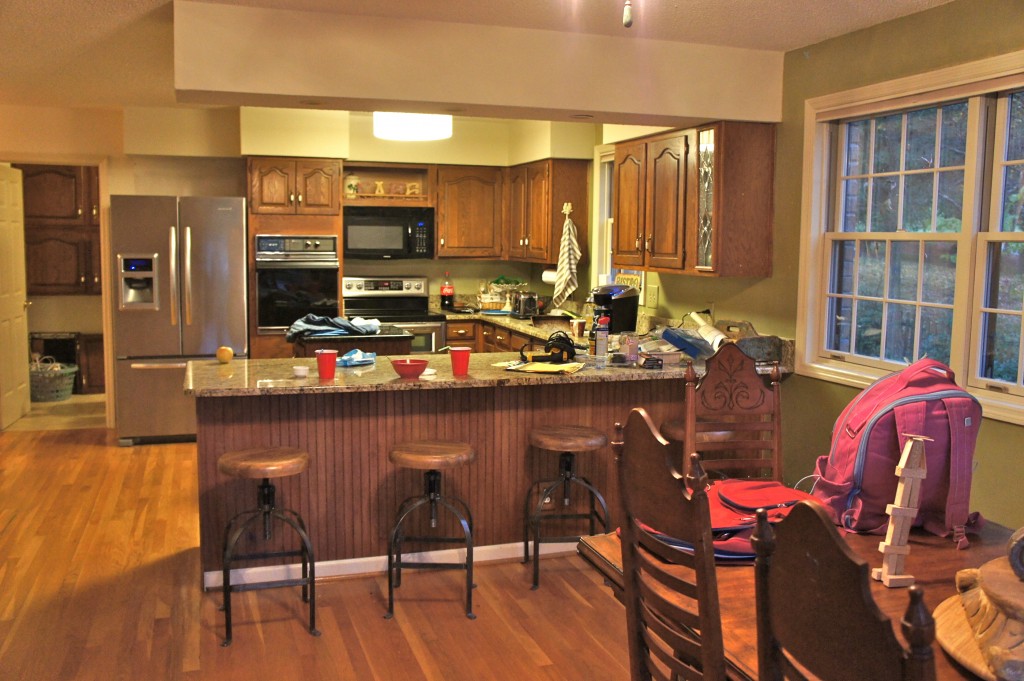
    dark wood cabinets

    This was our dark kitchen before the update.
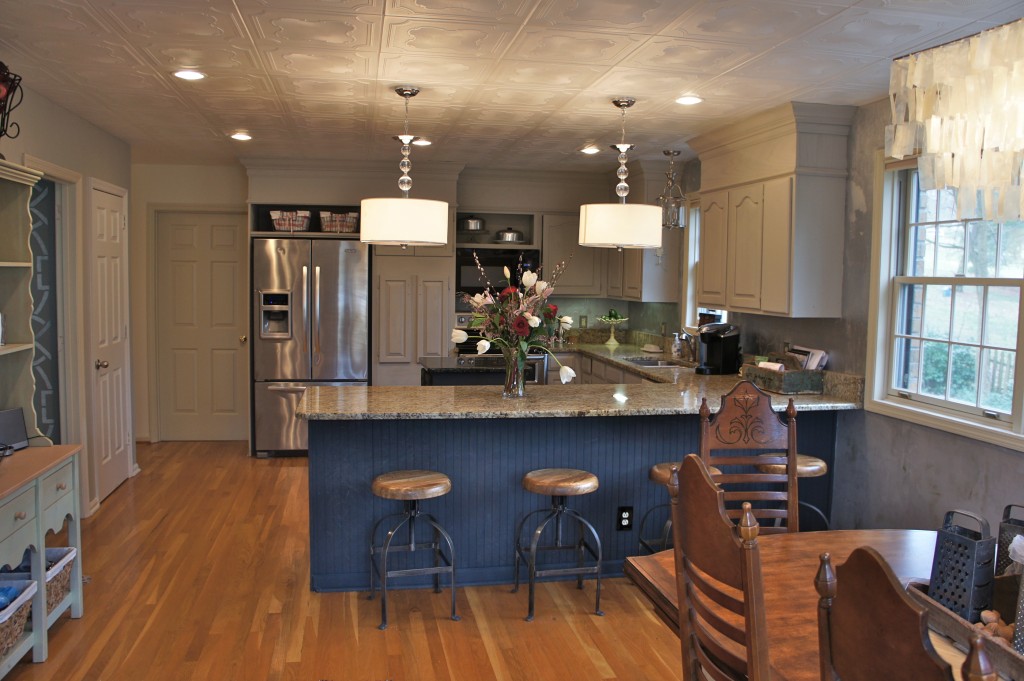
    Kitchen Cabinets painted with Annie Sloan Chalk Paint

    After some minor carpentry work we painted our kitchen cabinets for a totally updated look.

  2. Update your lighting– You would be amazed at what a difference it will make to replace fluorescent lights with incandescent lights. Florescent lights cast a blueish tint around the room. Incandescent lights cast a pure white light. Our current kitchen had fluorescent lights and a light with an alabaster shade. The alabaster light was throwing yellow light and the florescent light was casting blue. Updating those with bright white lights and adding about 10 can lights in the room made a HUGE difference.
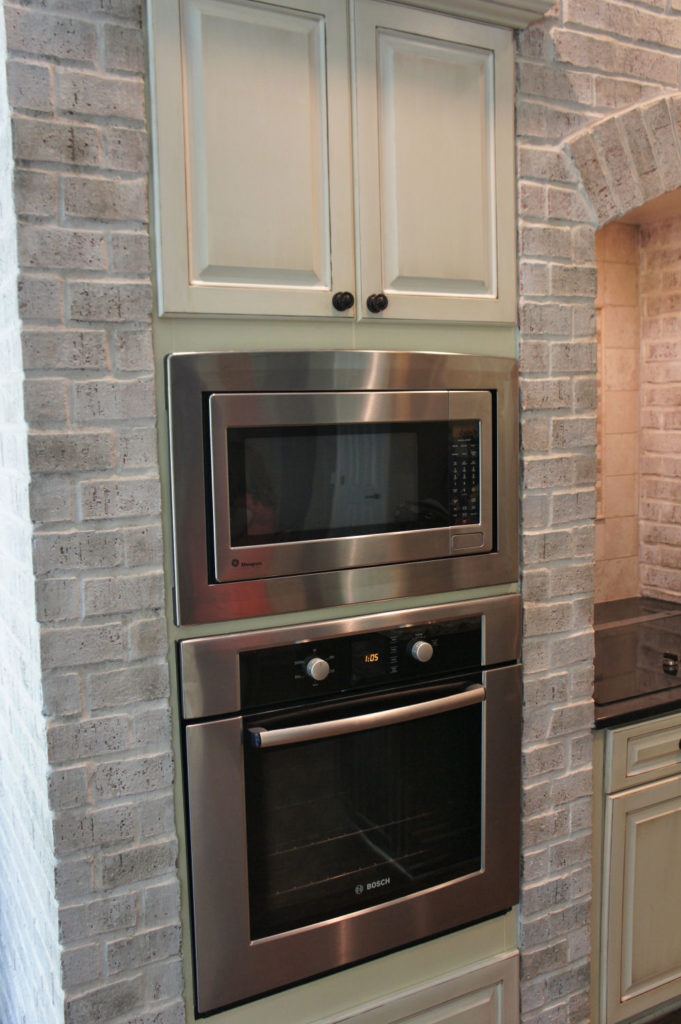
  3. Paint the hardscapes– We recently worked with a client who wanted everything lightened up, but was reluctant to paint the red brick in the kitchen. It took lots of persuasion and photo examples to finally talk her into it, but it made ALL the difference. Her exact words to me were, “It looks 1000x better”.
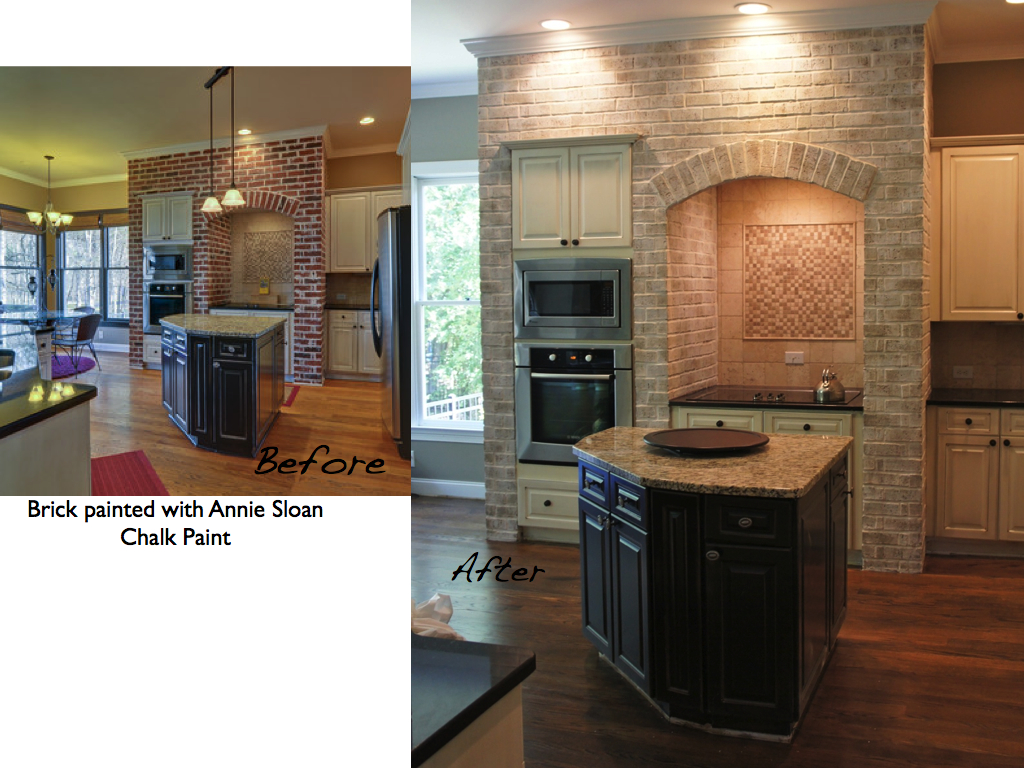
    painted kitchen brick before and after by Bella Tucker Decorative Finishes

    This is the kitchen brick before and after painting with Annie Sloan Chalk Paint.
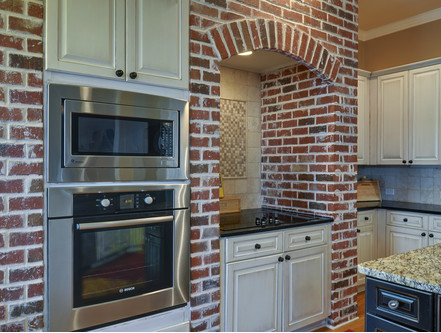
    red kitchen brick before painting

    Red kitchen brick before painting.

    brick painted with Annie Sloan Chalk paint

    After painting the brick with Annie Sloan Chalk Paint

    For this project we painted the brick with Annie Sloan Chalk Paint in Pure White mixed 3 parts water to 1 part paint. We then came back with Annie Sloan Chalk Paint in Coco, and French Linen to add dimension and highlights to the brick. We did the same thing on the fireplace which was visible from the kitchen.
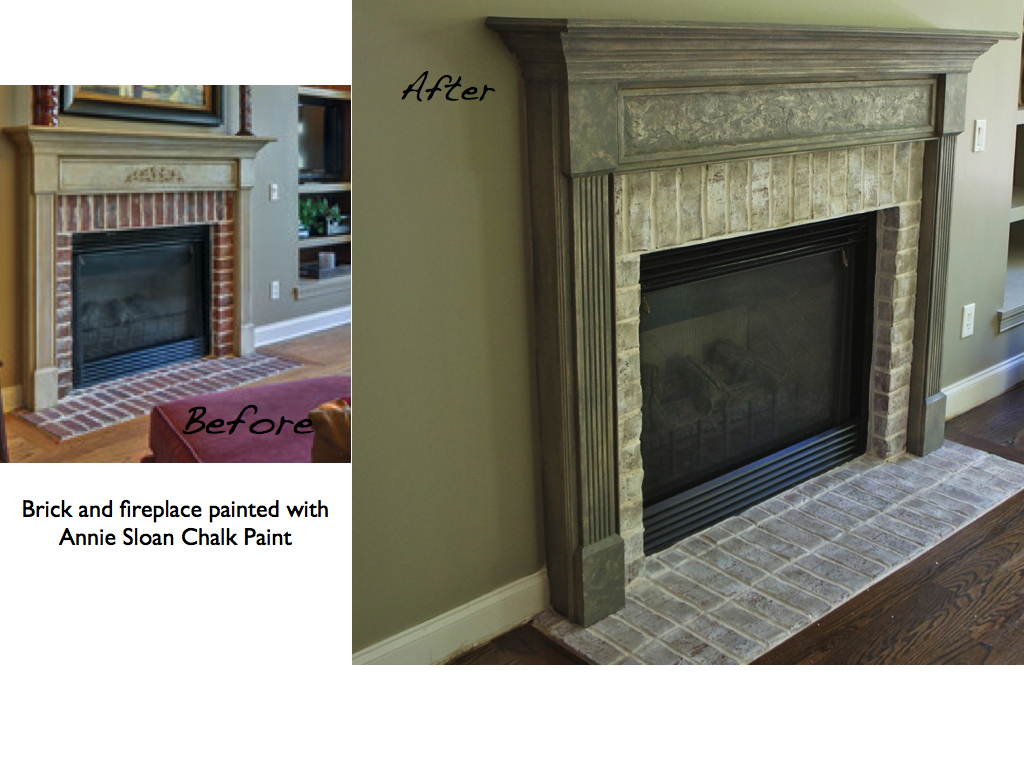
    Fireplace before and after painting with Annie Sloan Chalk Paint

    Fireplace before and after painting with Annie Sloan Chalk Paint.

    We painted the mantle in the same colors. Don’t be afraid to paint brick or wood. It always, always looks better and you can’t lighten up a room without it.

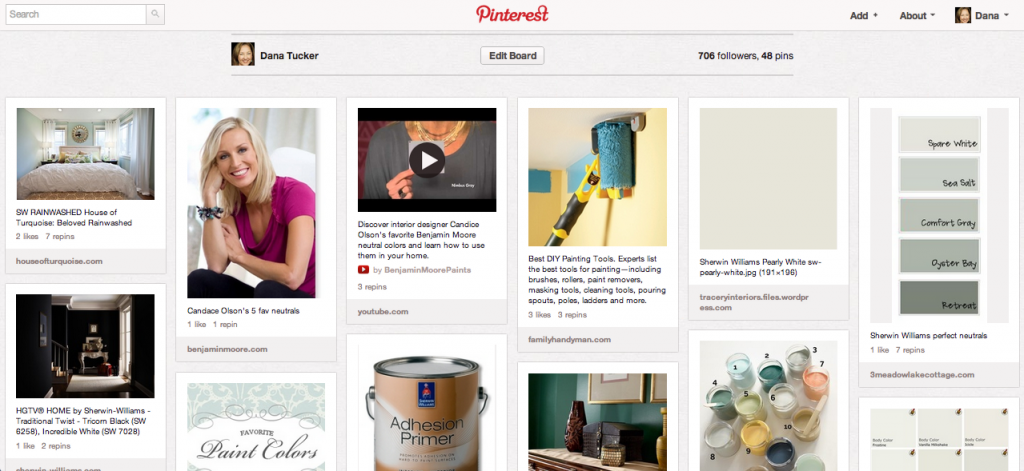
  4. Paint your walls– Our new favorite neutrals are the beigey-greys. Some of our no fail Sherwin Williams colors are: 7043 Worldly Grey, 7044 Amazing Grey, a nice concrete grey is 7064 Passive, a nice blue grey is 7057 Silver Strand, and my favorite beige is 7036 Accessible Beige. I love all these colors paired with 7035 Aesthetic White trim. For some additional paint color ideas check out our favorite paint colors on Pinterest.

    favorite paint colors board on Pinterest

    Follow our favorite paint color board on Pinterest

  5. Remove the counter clutter– Every kitchen looks cleaner and brighter without a bunch of clutter.
  6. Use mismatched chairs– Replace a couple of chairs at your kitchen table with painted chairs, slipper chairs,  or a banquette covered in a neutral fabric like linen or burlap.

There you have it, my top tips for lightening up your kitchen. Don’t forget to “Pin” your favorite images above for reference later. If you are not an avid DIY-er and you would like to talk to us about painting your kitchen cabinets in the Nashville TN area, please call us at 615-500-1517 or fill out the form below to schedule a FREE consultation. 

Contact Form

We would love to hear from you! Please fill out this form and we will get in touch with you shortly.

    Promise it will be great!

«
»

Filed Under: Annie Sloan Chalk Paint, Cabinet Painting, Decorative Painting, DIY, Education, Painted Brick, Tucker House

About Dana Tucker

By Dana Tucker | [email protected] | Google

Comments

  1. Shab 2 Fab says

    January 5, 2013 at 9:46 am

    Great makeover! I painted my fireplace last year with chalk paint. Easiest makeover ever 😉 http://shab2fab.com/chalk-paint-brick-fireplace-makeover/

  2. Linda says

    October 7, 2013 at 7:44 pm

    The red brick re-do is absolutely beautiful. I have a small red fireplace and would love to change it.
    Can you please tell me your technique? Did you just do 3 solid coats (one of each color) over the whole area? Or did you dab the top 2 colors over the Pure white?

  3. Dana Tucker says

    October 8, 2013 at 4:36 am

    We watered down the Pure white with about 50% water. After that dried we randomly applied and blended the other two colors. Good luck.

Leave a Reply Cancel reply

Your email address will not be published. Required fields are marked *

This site uses Akismet to reduce spam. Learn how your comment data is processed.

Looking For Something?

About Us

Brooks and Dana Tucker of Bella Tucker Decorative Finishes Bella Tucker is a collaborative partnership of husband and wife team Brooks (chief painter, creative talent and artist) and Dana (interior design & client relations) Tucker. We have painted over 300 sets of kitchen cabinets since 2007.

Read More!

Sign Up For our Newsletter

Let us handle your kitchen re-design. Call us today at 615-500-1517

Kitchen Re-Design & Painting

All over glazed cabinets- Bella Tucker Decorative Finishes
  • Blog
  • Kitchen Remodeling & Design
  • Cabinet Painting
    • Cabinet Painting Details
    • Before and After Photos- Painted Cabinets
    • Kitchen Cabinet Refinishing Franklin TN
    • Cabinet Painting Testimonial
  • Paint Color Consultations
  • Design Services
  • Gallery
    • Painted Cabinets & Furniture
    • Stencil Painting
    • Wall Finishes
    • Painted Floors
    • Ceilings
  • Tour Our Home
    • Bella Tucker featured on Apartment Therapy
    • Tour Our Home
    • Tucker House TV Features
    • Vintage Tucker Christmas
    • Christmas House Tour- Tucker Style

Categories

Read Our Awesome Reviews!

Houzz
Remodeling and Home Design
Franklin Specialty Contractors
Dana Tucker in Franklin, TN on Houzz
Remodeling and Home Design

Contact Us

  • This field is for validation purposes and should be left unchanged.

Get Insta-Inspired!

bellatucker

Instagram post 2198095115191777579_22932102 Christmas kitchen vibes. So excited about the photos I’m getting back from the photo shoot of my personal kitchen. I had to share. Design by @bellatucker 📷 by @visiblestyle
Instagram post 2193064614764582187_22932102 Ready for company. Come on over! 📷 @visiblestyle #irondoors
Instagram post 2191790462233593567_22932102 We had our kitchen photographed today all decorated for Christmas. I thought y’all might want to see a walk through. I’m crazy about vintage Christmas decor and have some fun pieces to show you. #vintagechristmasdecor
Instagram post 2185924893110253072_22932102 Such a treat to be able to see this completed e-design project this week while on vacation at the beach. Swipe to see how we redesigned the stove hood to better fit the style of my client and this gorgeous home. More in stories. #plasterhood #plasterhoodvent
Instagram post 2173468360858487455_22932102 We rarely set the table around here. Life is so busy. You know? Today we are celebrating an early Thanksgiving with our family. I want them to feel special and know how much I love them. So bringing out all the pretties. Do you set your table regularly?
Instagram post 2171963429945218011_22932102 If possible, I always try to move a cooktop OUT of the island when renovating. The island should be for gathering, food prep, buffets, homework, etc. Swipe to see the before photo.  Design by @bellatucker 📷 by @geinger
Instagram post 2171285547589629254_22932102 I am obsessed with h vintage art and can’t stop buying it AND using it in my photo shoots. Who else is obsessed? Design by @bellatucker 📷 by @visiblestyle
Instagram post 2169746070685670667_22932102 A wall of beveled subway tile. The stuff dreams are made of. 
Design by @bellatucker 📷 by @visiblestyle
Instagram post 2169065520719232842_22932102 Here’s another look at the kitchen renovation I shared yesterday. I love the combo of warm woods, greige cabinets, and white tile. And the best clients!!! Swipe for before. 
Design by @bellatucker 📷 by @visiblestyle 
#kitchendesign #kitchenremodel
Load More...

Pin With Bella Tucker

Nashville TN Cabinet Painting and Decorative Painting. Call for a free consult today at 615-500-1517 All content Copyrighted by Bella Tucker Decorative Finishes 2016

By Dana Tucker | Bella Tucker Decorative Finishes | [email protected] | Real Estate Websites

Cookies

This site uses cookies: Find out more.