• Skip to primary navigation
  • Skip to main content
  • Skip to primary sidebar
  • About
    • Tour Our Home
      • Bella Tucker Christmas Kitchen 2019
      • Bella Tucker featured on Apartment Therapy
      • Tour Our Home
      • Tucker House TV Features
      • Vintage Tucker Christmas
      • Christmas House Tour- Tucker Style
  • Portfolio
    • Kitchen Remodels Before and After
  • Kitchen Remodeling & Design
    • Design Services
  • Cabinet Painting
    • Paint Color Consultations
  • Blog
  • Testimonials
  • Contact
  • Shop Favorites
  • Design Packages
  • Nav Social Menu

    • Email
    • Facebook
    • Instagram
    • Pinterest
    • RSS
bella tucker kitchen remodeling and kitchen cabinet painting

Bella Tucker

Kitchen Design-Cabinet Refinishing-Nashville TN

Our New House Kitchen Makeover | Chalk Painted Cabinets

By Dana Tucker 70 Comments

Painted Cabinets by Bella Tucker Decorative Finishes in Annie Sloan Chalk Paint
Annie Sloan Chalk Painted Cabinets by Bella Tucker Decorative Finishes

What a crazy last few months it has been. Aside from our regular workload we participated in two show houses, bought a house that wasn’t for sale, sold our house without a realtor, moved, remodeled the kitchen, hosted Thanksgiving for thirteen at the new house, and have actively been updating several rooms. Whew! Time for a deep breath.

I was going to wait to tell this story until we got the kitchen completed, but with our current work load, (thank you Jesus!) I don’t think it’s going to be anytime soon. So, I thought I would go ahead and share a few of the details and projects with you. So, here goes…

Last year, one of my very best friends bought a house on 4 1/2 acres. I visited her often over the last year and every time I was there I would tell her how much I wanted to move to her new neighborhood. I knew every house that was for sale, the square footage, the acreage, the sales price. I had made it my mission to find us a place out there. After many months with no such luck, she suggested that I leave notes in people’s mailboxes to see if they would like to sell their houses. On a whim, one Friday afternoon, I did just that. I rode through the neighborhood and left notes for about 8 people. Secretly, I had one house in my heart.

Our new house
The house on my heart

About two weeks passed and I got a call from a guy who said he had gotten my note and was interested in talking to me. He owned the house next door to my friend. The one I had secretly longed for. He was very skeptical at first. I know he thought I was crazy. Long story short, we reached an agreement on price, I listed my house with a flat fee MLS service and sold it in 30 days.

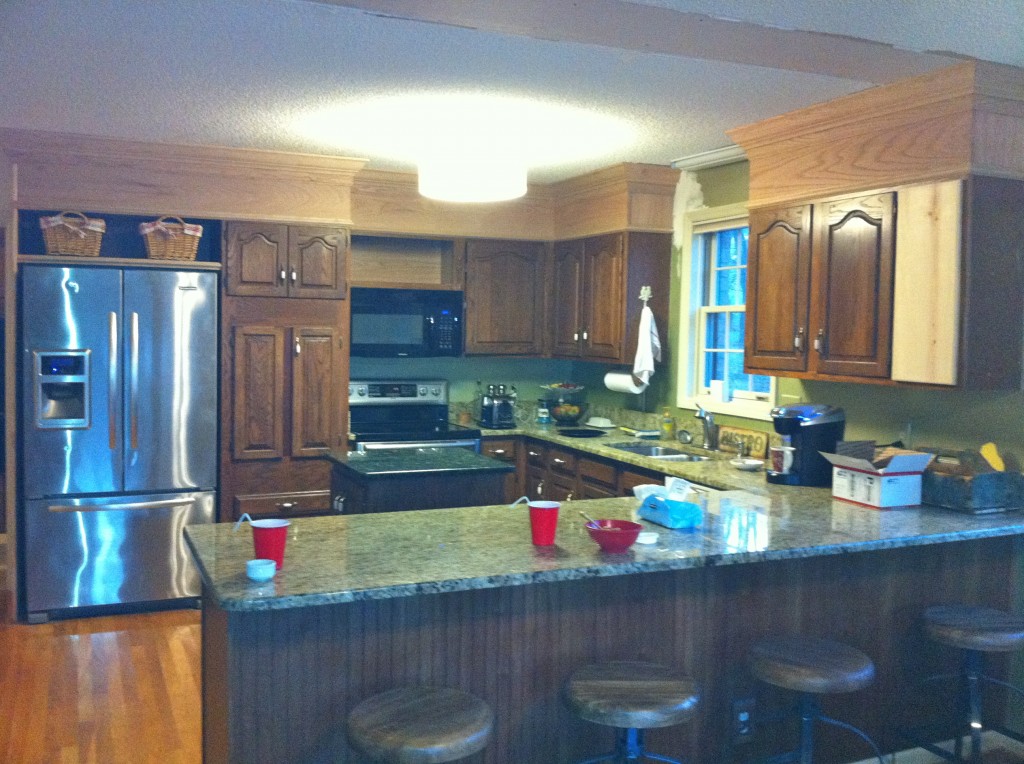
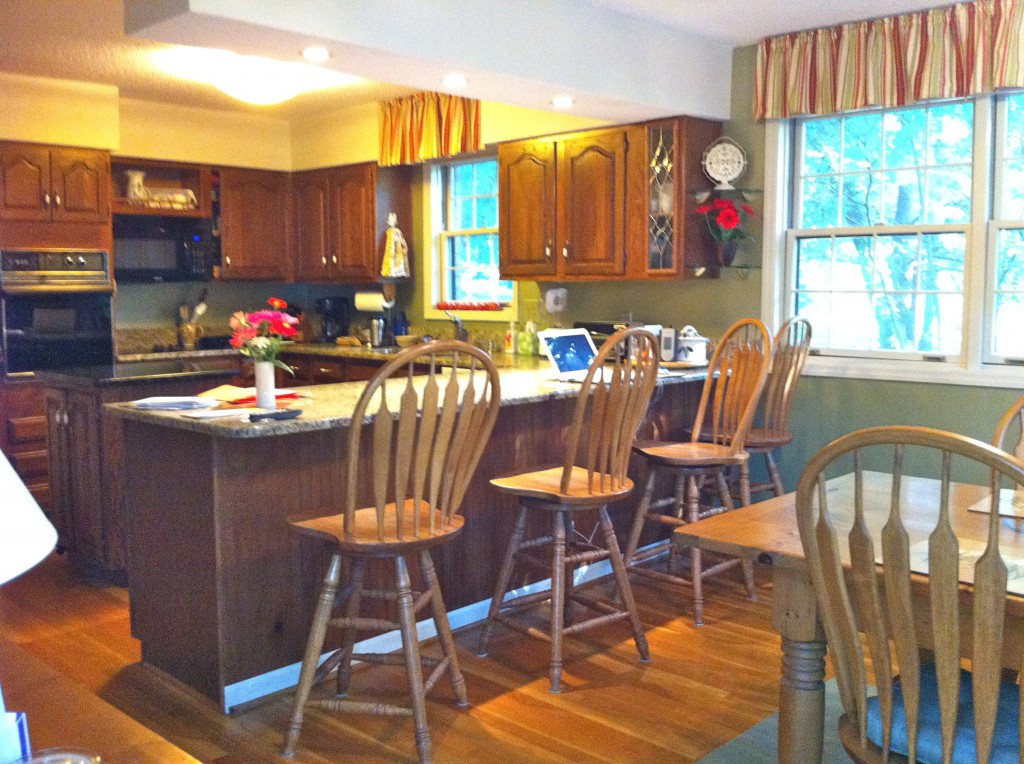
So, this new house has a great layout, beautiful property and gorgeous floors. It did, however, need some cosmetic updating. Our first project was the kitchen. Here is a before shot.
kitchen before
Kitchen before with dark cabinets, soffits, short cabinets, bad lighting

I hated the soffits hanging from the ceiling.
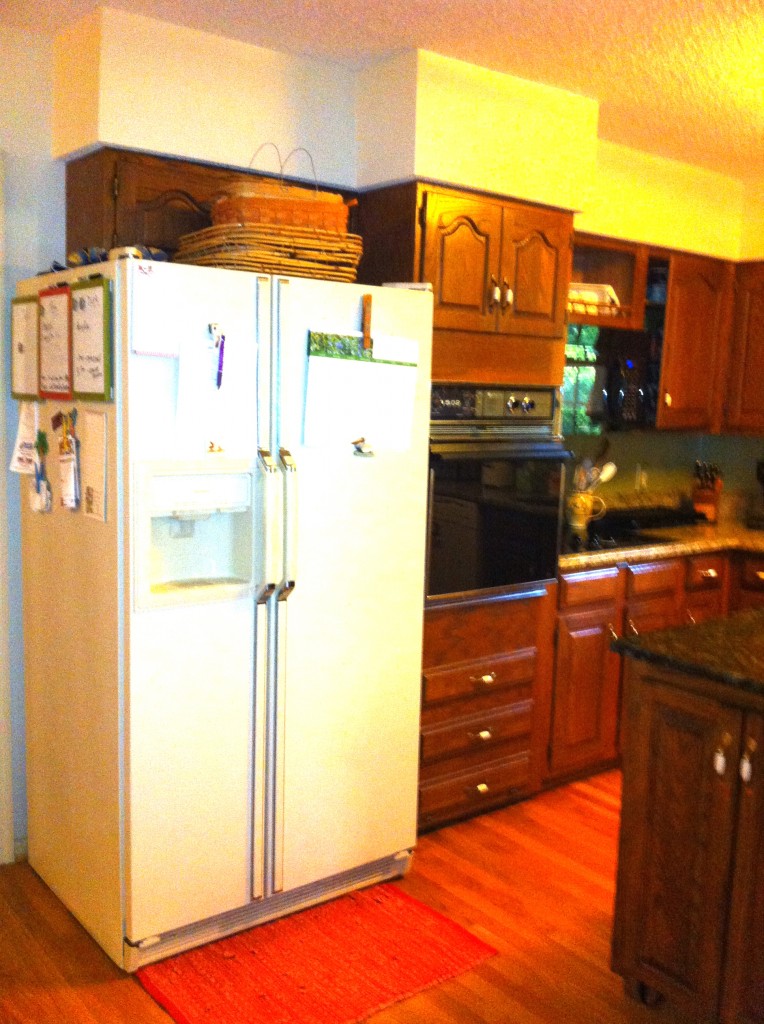
Kitchen before photo
Refrigerator floating in the room, wall oven, cook top, dark cabinets before

Since we had a shoestring budget, my vision was to tear out the soffits and build the cabinets up to the ceiling.
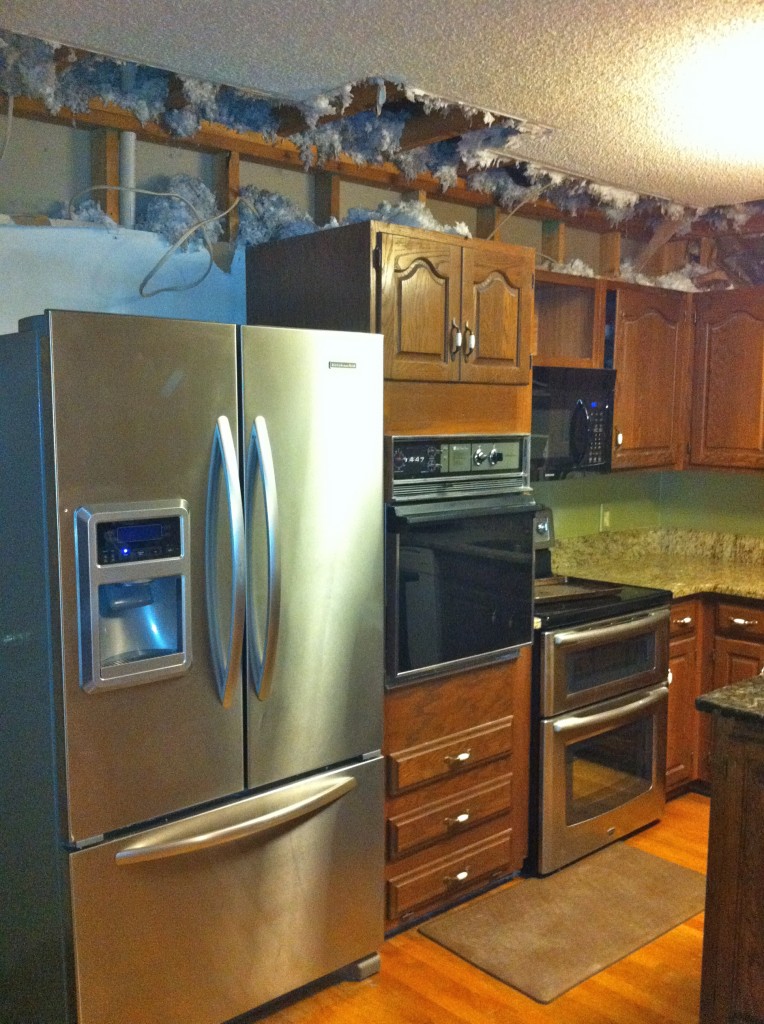
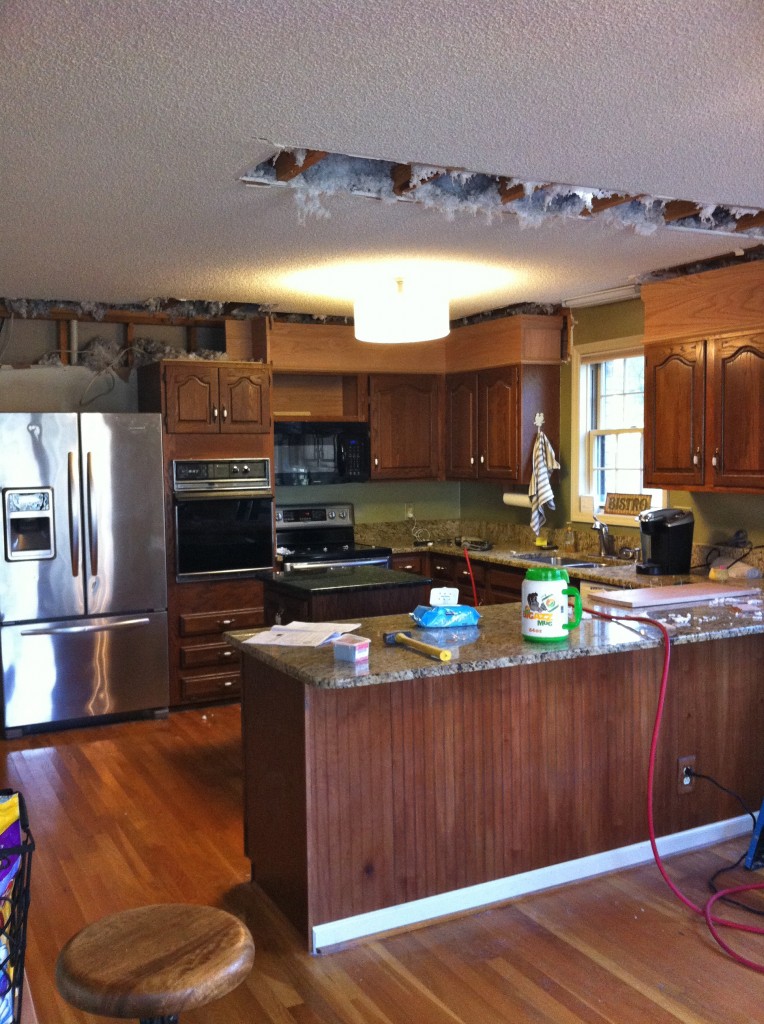
Removing soffits above kitch cabinets
We removed the soffits from the kitchen cabinets
Soffits removed and cabinets built up to the ceiling
Cabinets built to the ceiling. Now they need paint.

Cabinet Painting

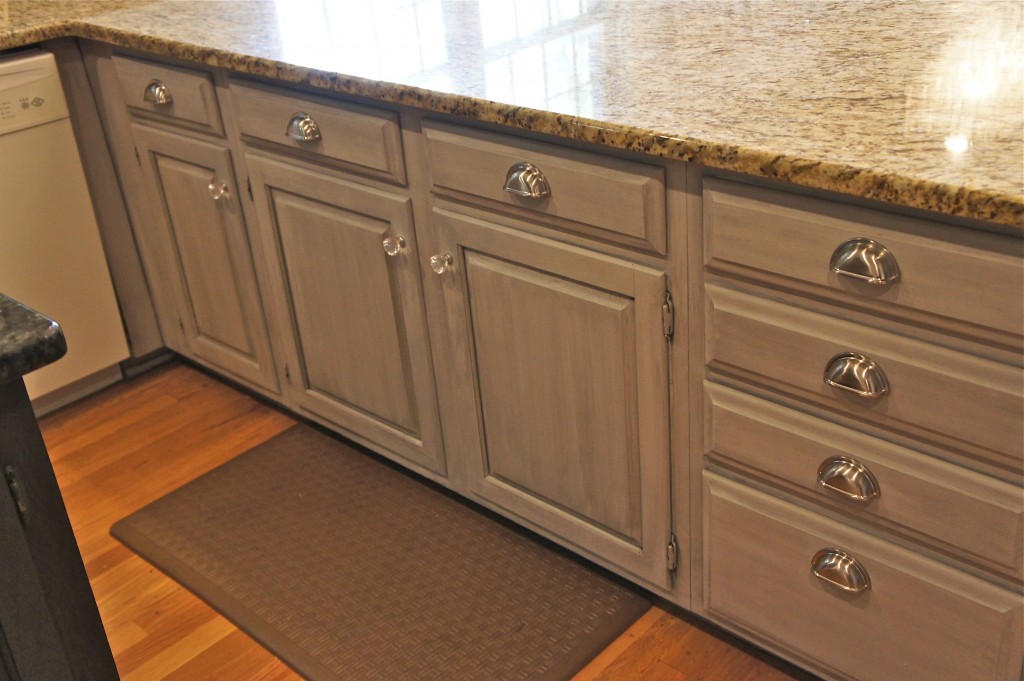
Since Brooks paints cabinets for a living, I knew that we could unify the cabinets with a couple of coats of paint. With our crazy hectic schedule, we have only had time to put on one coat of paint, so the paint finish is still a work in progress.
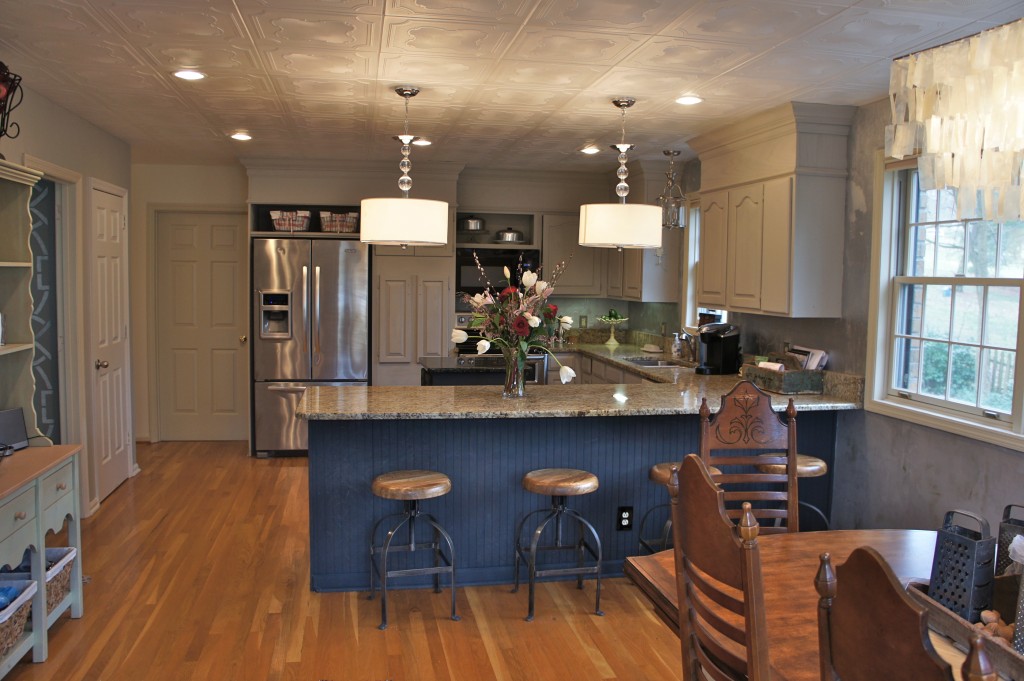
Kitchen Makeover Mostly Complete

We need to add another coat of paint, and some protective wax. And add some new hardware. This is a custom color we mixed with Annie Sloan Chalk Paint. It is 50% Pure White and 50% French Linen. We painted the island in Graphite.
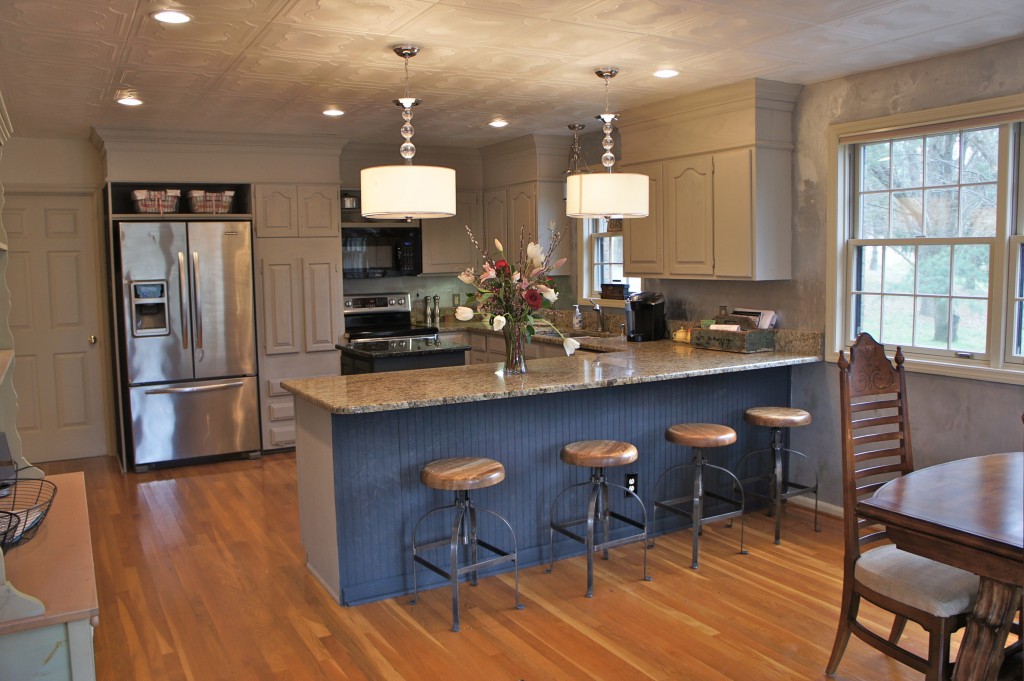
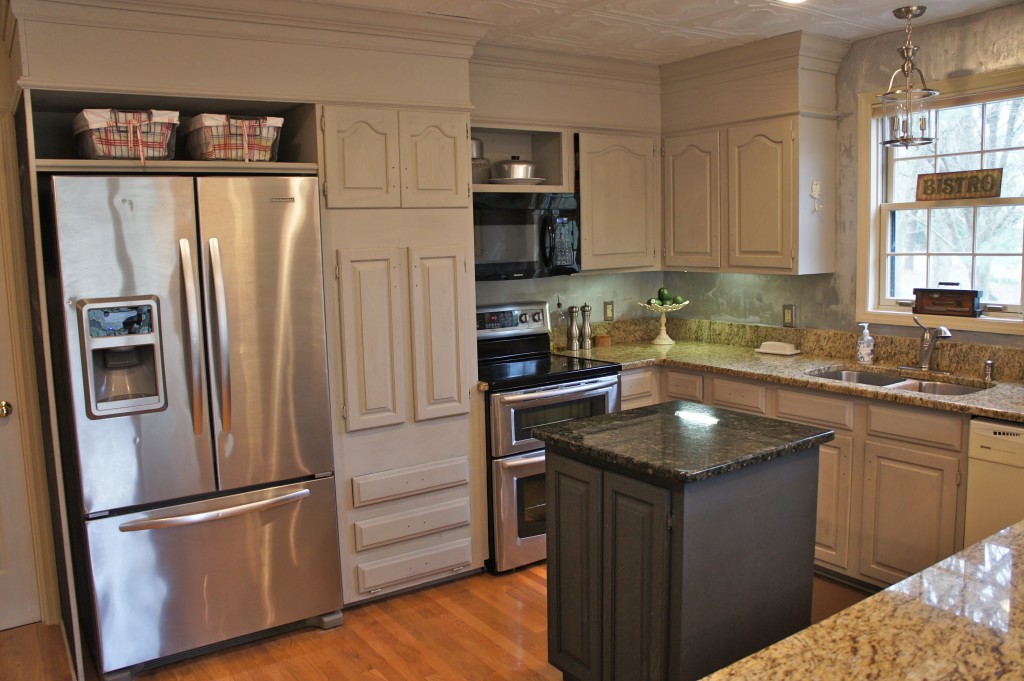
Island painted in Annie Sloan Paint Graphite
Wall oven removed, refrigerator built in, cabinets built up and painted.

We also removed the original wall oven, removed the cook top and the cabinet underneath it and dropped in a double oven range. We built the additional cabinetry around the refrigerator and added storage above.
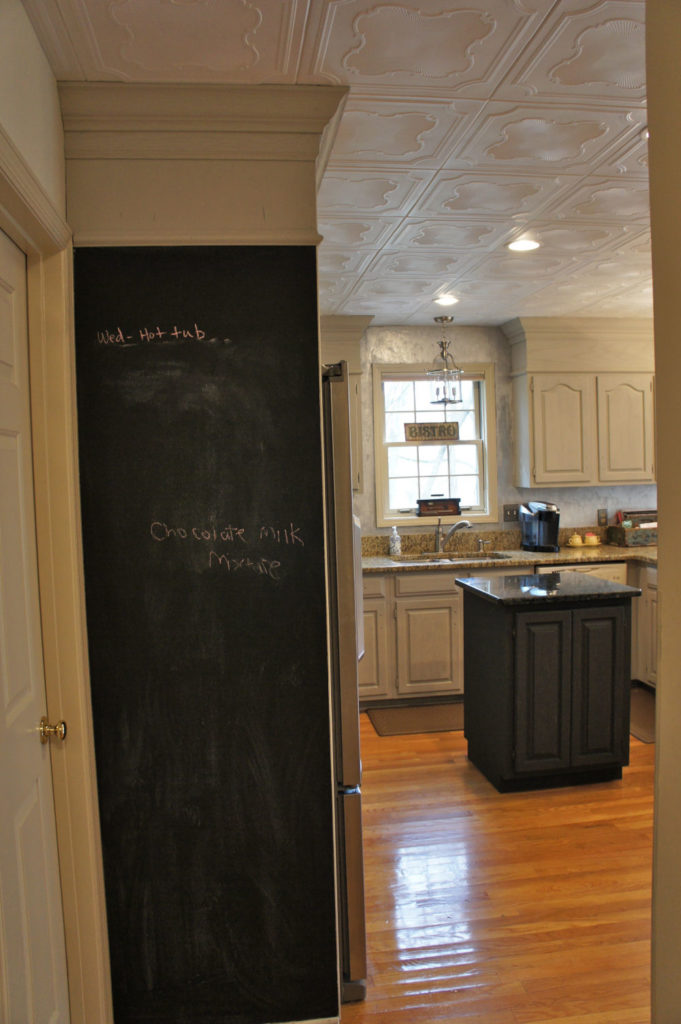
Refrigerator built in with chalk board wall

Now that we had ripped out the soffits we had to deal with the ceilings.
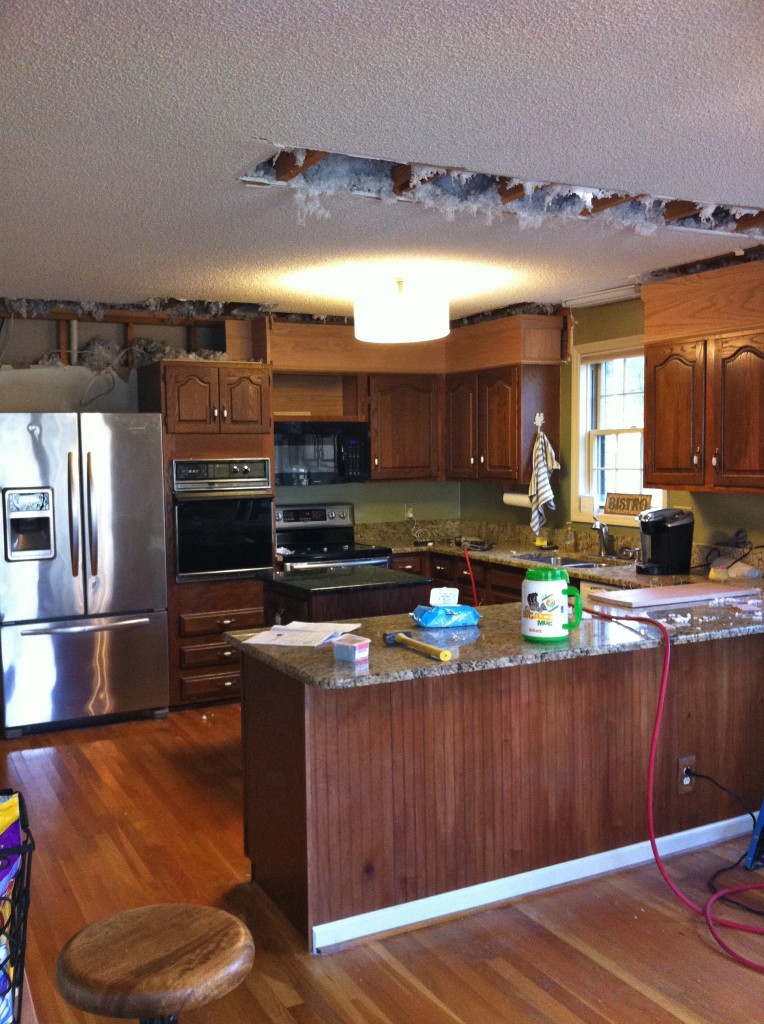
Ripping out the soffits left a damaged popcorn ceiling

Rather than patching the holes with drywall, removing the popcorn texture and painting the ceiling, we opted for something a little different. I found these (affiliate link) faux tin ceiling tiles that were made out of Styrofoam.
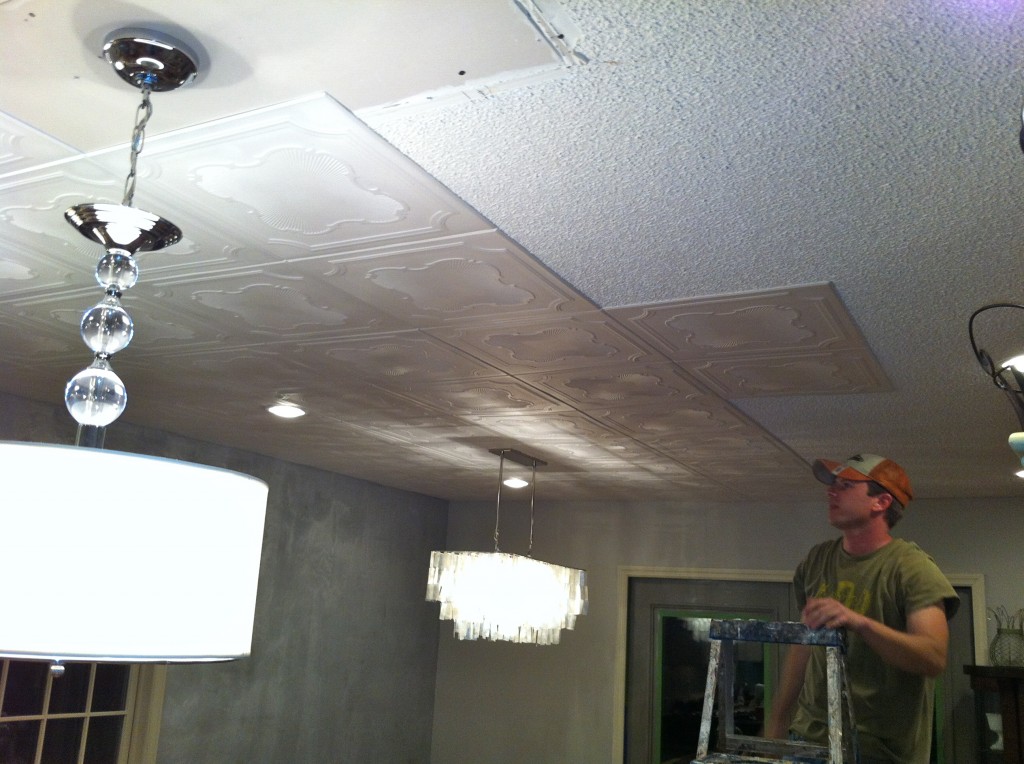
Styrofoam ceiling tiles glue right on top of popcorn ceilings

You cut them to size with an exacto knife and glue them right to the popcorn ceiling. It took about a day and a half to install, but I could not be happier with the way it turned out.
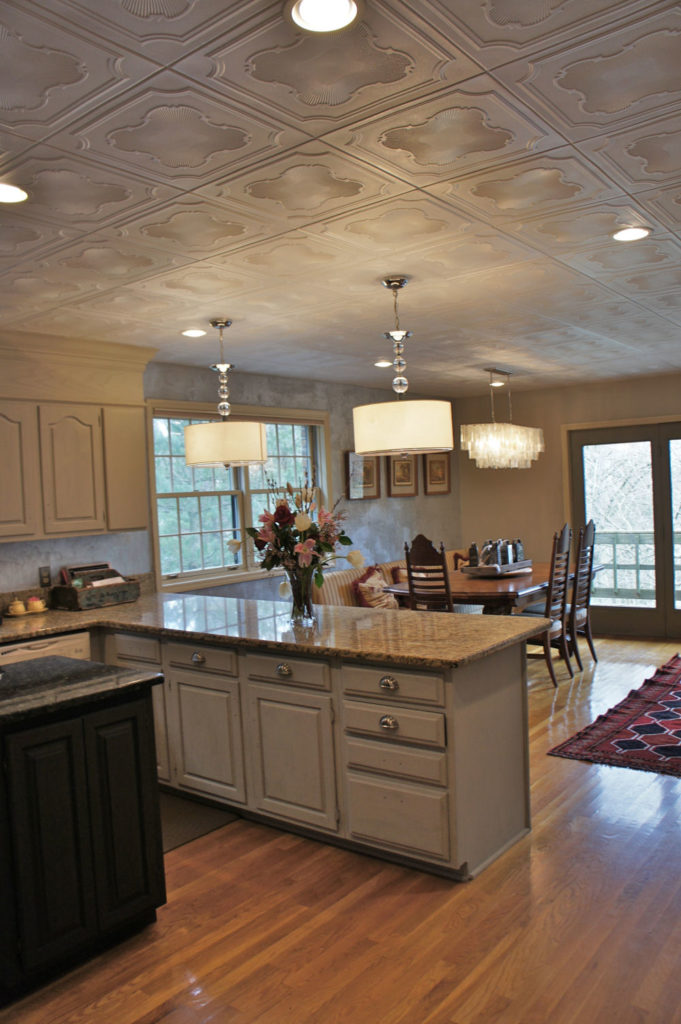
Styrofoam glue up ceiling tiles. An amazing transformation.

I also have to mention the walls.

Aluminum Metallic Painted Wall by Bella Tucker Decorative Finishes

Brooks applied an aluminum metallic paint with a roller and let it drip and drag in a random pattern. I love it!

While we had the ceiling torn out we also upgraded the lighting. We added 10 can lights in a grid pattern around the room. We removed the original ceiling fan and centered the new chandelier over the table. We also installed these two pendant shades over the island and added a lantern over the sink.
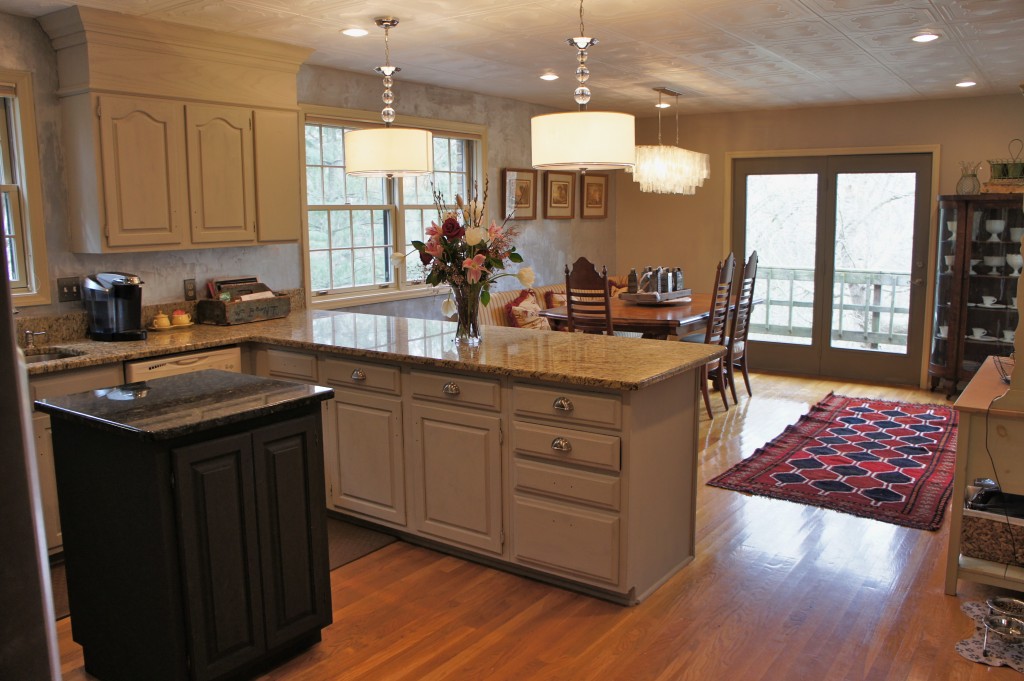
New Kitchen Lighting

Resources:

Click on the image to go to the product page for more details. If you make a purchase, I make a small commission but it never costs you a penny extra.

[show_boutique_widget id=”667289″]

Hope you enjoyed the kitchen makeover preview. The total project cost was about $4000 not including the new refrigerator and oven. I bought those at the Sears Outlet for $2500 total. The ceiling tiles are from Decorative Ceiling Tiles The pendant lights and the lantern came from Overstock. The Capiz shell chandelier came from West Elm. The bar stools came from World Market. If you would like to makeover your kitchen, we would love to talk to you. You can check out our Cabinet Painting page on our website or you can schedule a consultation by contacting us by filling out the form below or calling us at 615-500-1517. 

Contact Form

We would love to hear from you! Please fill out this form and we will get in touch with you shortly.

    Promise it will be great!

Want to see how the Ceiling Tiles have held up after 5 years?

Next up, I’ll take you on a tour of the new den and the fireplace makeover.

Tweet
Share
Pin407
Share27
434 Shares

Filed Under: Annie Sloan Chalk Paint, Cabinet Painting, Decorative Painting, DIY, Faux Finishing, Tucker House

About Dana Tucker

By Dana Tucker | [email protected] | Google

Reader Interactions

Comments

  1. [email protected] says

    February 18, 2012 at 11:55 am

    This is simply awesome, Dana! What an amazing transformation – I know you have got to be thrilled out of your mind!!! Great work by you and your hubby 🙂

  2. admin says

    February 18, 2012 at 11:58 am

    Thanks so much Kristie! We love it!!

  3. Ellen says

    February 18, 2012 at 11:59 am

    Great ideas! I especially love the faux tin ceiling! I’m sure I won’t be the first person to wonder about taking it down. Is it worse than taking down the popcorn by itself? If if it’s damaged, can one tile be replaced? At my house, sooner or later someone is going to poke that ceiling with a broom handle or something else. I’d love to do that, but don’t want to dig myself a deeper hole.

  4. admin says

    February 18, 2012 at 12:05 pm

    Ellen, thanks for your comment. The beauty of the ceiling is that each tile is placed individually. If it gets damaged you can just pull it down and pop another one in it’s place. They cost under $4 per tile, so it would be an easy fix.

  5. Kathy Otto says

    February 18, 2012 at 12:10 pm

    love the chalk board on the side of the fridge!! great idea! Looks terrific.

  6. admin says

    February 18, 2012 at 12:22 pm

    Thanks Kathy! We are having fun with the chalk board. As you can see in the photo, my daughter is too. That is her note to remind me to get some chocolate milk. 🙂

  7. Regina - Fauxology says

    February 18, 2012 at 1:30 pm

    LOVE this transformation!!! Like, every aspect!

  8. Rachel Sejas says

    February 18, 2012 at 1:38 pm

    Dana, that looks awesome. The French Linen mix is perfect. I love all the changes you made. I sure wish I had known about those tiles a few years ago.

  9. Ellen says

    February 18, 2012 at 2:21 pm

    Good news about the ease of replacing tiles. Thanks!

  10. Ellen says

    February 18, 2012 at 2:32 pm

    If anyone else is looking for those tiles, I found them on Amazon for $3.19. Not eligible for Amazon Prime shipping.

    http://www.amazon.com/Decorative-Styrofoam-Ceiling-Popcorn-Paintable/dp/B00319I21G

  11. Amanda says

    February 18, 2012 at 4:58 pm

    You are an inspiration. Gorgeous! Congratulations!

  12. admin says

    February 18, 2012 at 5:26 pm

    Thanks everyone for the nice comments. I appreciate you stopping by and checking out our project 🙂

  13. Sabrina says

    February 19, 2012 at 11:08 am

    I love what you’ve done. It’s all gorgeous! But I’m wondering if you wouldn’t mind telling me where you got those barstools. I love the industrial look of them!

  14. admin says

    February 19, 2012 at 12:38 pm

    Sabrina, thanks for the comment. I got the stools at Southeastern Salvage. If they don’t have one where you are, you can get something similar at World Market. Good luck.

  15. Milan Jara says

    February 19, 2012 at 9:22 pm

    Hello Donna,

    I am the owner of the company where you got your tiles from. I LUV the way you have remodeled that kitchen.. What a transformation of the oak cabinets with paint..I have done few kitchens that way myself in the past. It is very rewarding… 🙂 Anyhow, thanks for sharing that. I am inspired by your project and will go now and share it with our fans and my friends.

    Milan

    P.S: Someone left the link above to another tiles. Here is a link to the ones you have used : http://www.decorativeceilingtiles.net/products/R%252d74–Ceiling-Tile.html

  16. Joan says

    February 20, 2012 at 9:02 am

    Beautiful job! I really like it!!!

  17. Russ Turner says

    February 20, 2012 at 1:42 pm

    As a colleague of Milan I can wholeheartedly confirm that his products and service are first class.

    Apologies if this sounds promotional but believe me this man is an ace at customer relations.

  18. seattle painting says

    February 24, 2012 at 11:57 pm

    Great job with the before and after pictures. The aluminum wall paint pictures turn out very well. Found your post on G+ by the way.
    John
    http://www.shearerpainting.com/Faux%20finish%20page.php

  19. Lesley Kinney says

    March 9, 2012 at 3:31 pm

    Stunning, absolutely stunning!!

  20. admin says

    March 9, 2012 at 4:13 pm

    Thanks so much for the comments. I really appreciate you guys!!!

  21. Michael says

    May 30, 2012 at 11:07 am

    Excellext job!!! I’m about to do the same thing with the soffit. What did you use to build up the cabinets? Is that plywood or wallboard? Did you do anything special to secure it?

  22. patti says

    June 2, 2012 at 8:38 am

    What a beautiful kitchen! I’m wanting to chalk paint my oak cabinets and want them sort of an almond color. In some photos that is how yours look and in some photos they have a yellow cast. In person, do they have that yellow cast to them? I’m trying to decide on which paints to mix. Also, did you use clear wax and did you do any sanding to distress? Love the ceiling too!

  23. admin says

    June 5, 2012 at 5:26 am

    Patti, thanks for the comment. They do not have a yellow cast at all. They are a true grey and we LOVE the color. It would depend on the lighting in your kitchen though. I’m embarrassed to say that we haven’t had time yet to finish them. We will soon be adding another coat of paint and the clear wax to complete and protect them. Thanks again for stopping by.

    dana

  24. admin says

    June 5, 2012 at 5:28 am

    Michael, thank you! The carpenter used plywood. As far as I could tell he used screws and wood glue to fasten it together. Since the material is light weight I don’t think we will have any problems. Thanks for the comment and good luck with your project!

  25. Shirley says

    June 20, 2012 at 12:11 pm

    Job well done. I am going to do the same thing this summer. BUT, I will replace 12″ high cabinet above the original cab. So that I will have more storage. I just don’t like soffits, I will not take them off then put a new soffit back.
    Love the tin ceiling idea. Great thinking on that part.

  26. admin says

    June 20, 2012 at 1:45 pm

    thanks so much for the comment. Good luck with your kitchen renovation.

  27. Kelly says

    June 26, 2012 at 3:52 am

    I just found your makeover- love it! Is that a sofa you use for the kitchen table or is it a special dining bench?

  28. admin says

    June 26, 2012 at 6:04 am

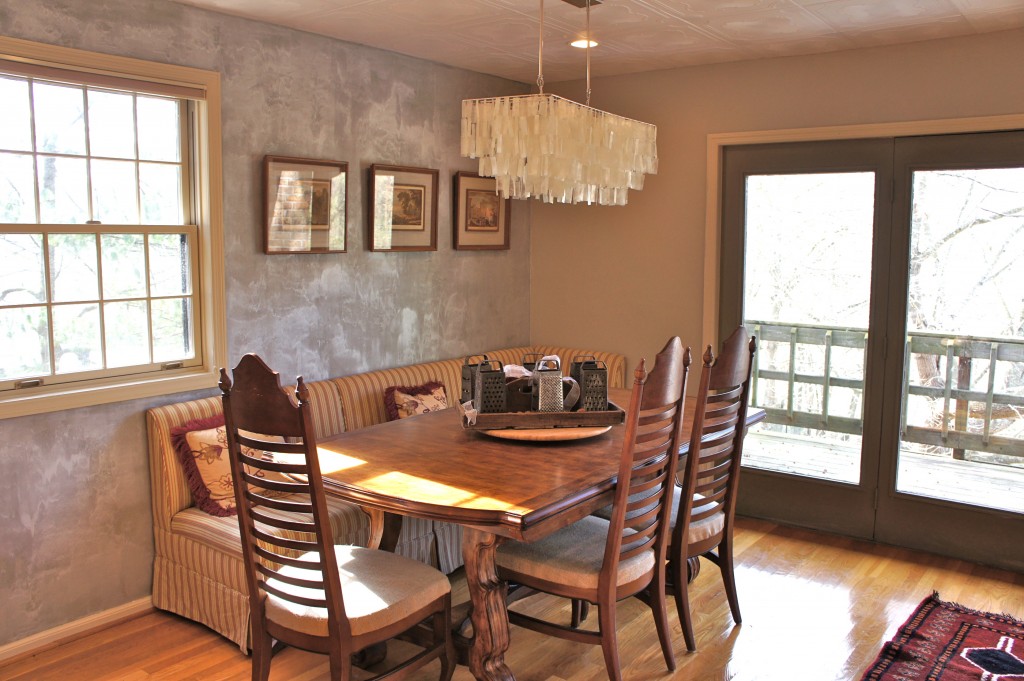
    thanks Kelly! It is a banquette dining bench from Ballard designs. We have had it for about 7 years and two different houses and we still LOVE it!

  29. Sue says

    July 1, 2012 at 7:31 pm

    I love what you did with the Anne Sloan paint! Do you have any experience with, or knowledge of using it on rough T 1 – 11 paneling ? The house we purchased has it inside as paneling. I would like to white wash the walls. Any help or tips you could give me would be greatly appreciated! Thanks.

  30. admin says

    July 2, 2012 at 6:35 am

    Thanks Sue! Annie Sloan paint is fantastic and will paint over any surface. I’d recommend painting with Pure White and using a dry brush technique where you just get a little paint on the brush and spread it vertically as far as it will go and feather it out in light even coats. You could wipe off the excess paint. That should bive you the white wash look you are going for. Good luck.

  31. Kristin Fitzgerald says

    July 17, 2012 at 10:19 am

    Great transformation!

  32. admin says

    July 17, 2012 at 10:30 am

    Thanks so much!

  33. sydney85 says

    July 23, 2012 at 9:17 am

    Love your new kitchen! I am very interested in the use of the chalk paint for your kitchen cabinets. My kitchen is about the same size so I was wondering how much paint and clear stain you used. Any chance you work in Austin, Texas?

  34. admin says

    July 23, 2012 at 9:23 am

    Thanks so much! We used about 6 quarts of paint. Three of each color mixed in batches. We used about three containers of wax. We do actually travel to Austin, TX. Brooks’ parents live in Wimberely. Let us know if you’d like to talk about your project. He will be there in December. Thanks for the comment.

  35. Nancy says

    August 17, 2012 at 11:34 am

    Love how you used the Annie Sloan paint. Have just started using it myself and was thinking of attemping the kitchen cabinets also. I was interested in the color of the paint you have used on the outside of the bar area. It looks like a blue or is it the graphite and just looks blue from the lighting? Thank you.

  36. admin says

    August 17, 2012 at 11:41 am

    Thanks so much for the comment. The bar was done in ASCP graphite. Good luck.

  37. Jenn says

    October 9, 2012 at 7:13 am

    LOVE the kitchen! We did a DIY kitchen transformation years ago but never could figure out what to do with the old popcorn ceiling so we patched it and it has bothered me ever since, especially since the kitchen is open to another room with a nice new flat ceiling. My questions: did you paint the tiles, and how did you manage a seamless transition to the crown moulding on the cabinets? Did you add another trim piece after the fact? THANKS!

  38. admin says

    October 9, 2012 at 11:31 am

    Jenn, thanks so much for the comment. We did not paint our tiles, but the tiles are paintable. This is the white color that they come in. The tiles are very easy to trim with an exacto knife, so we were able to trim them beautifully to make a seamless transition with the tile place right up next to the cabinet crown molding. You will love this product.

  39. Deborah says

    October 25, 2012 at 11:11 pm

    Absolutely stunning! One of the prettiest kitchens I’ve ever seen!!

  40. admin says

    October 26, 2012 at 5:05 am

    Deborah, thanks so much for the nice compliment. We are so glad you like it. 🙂

  41. Cindy says

    January 1, 2013 at 6:54 pm

    Your kitchen is beautiful. Are you still happy with using the chalk paint and wax finish for your kitchen cabinets? Did you sand your cabinets first?

  42. Dana Tucker says

    January 5, 2013 at 7:07 am

    Yes, we are still very happy with the chalk painted cabinets. Thanks for stopping by!

  43. Hollye Miller says

    February 5, 2013 at 10:05 pm

    I love this transformation! I was wondering are your ceilings 8 foot high or do you have 9 foot ceilings or higher? I love all of what you have done and am about to start our kitchen and would love to use the tiles and the lighting which I am not sure how it would work on our ceilings, thanks!

  44. Dana Tucker says

    April 21, 2013 at 5:30 am

    Our ceilings are 9ft. Thanks so much for the compliments and for reading the post 🙂

  45. Elizabeth "Liz" williams says

    June 3, 2013 at 10:47 am

    Thank you so very much for submitting the information about the popcorn ceiling and the beautiful transformation of your kitchen. I needed and do need all of the info you have shared with us. Hopefully I will send pictures when I have finished my kitchen and other rooms as well.

  46. Dana Tucker says

    June 3, 2013 at 12:05 pm

    Thanks so much for the comment. I hope it helps your remodel. Popcorn is a royal PAIN. I’d love to see photos when you are done 🙂

  47. Catherine says

    June 3, 2013 at 1:58 pm

    Did you cut through that popcorn ceiling when you took out the upper cabinets? If your home was built 1970’s or before, that popcorn has asbestos fiber in it. Very very dangerous if you deal with it dry because of the dust it creates, and leaves in your house. If you’re going that route, you really should have an asbestos co. remove it. On the other hand, if you want a really inexpensive and healthier way to deal with it, spray the ceiling with water then scrape. Its like soggy paper and as long as its soaked no worry about asbestos. My friend and I did a 1200 sq foot house in maybe 2 hours. He sprayed the ceiling with an industrial sized sprayer that he used at work, I followed with a ladder and used a paint scraper. We kept the old carpet as a drop cloth, rolled it up and put it outside. Our contractor took care of it the next day. We were naive and didn’t know about the dust until we had already tried a small patch dry. The next day he went in and was violently sick. That’s when we learned what to do. Your house looks lovely, just a tip if you’re not putting up another ceiling, and it was free except for the labor!

  48. Dana Tucker says

    June 4, 2013 at 5:21 am

    Wow! Sorry about the trouble with your project. Our house was built in 1987, so we didn’t have any asbestos concerns. Thanks!

  49. Catherine says

    June 4, 2013 at 5:28 am

    Glad to hear it 🙂 I’m just glad we figured it out before we did too much, a very simple process and just a few hours time. Didn’t know you could glue those things up the only ones I recalled you had to use brads or something similar. Good luck with the rest of the house, looks great!

  50. Sandyu L. says

    June 5, 2013 at 5:27 pm

    Love the faux ceiling tiles. Would love to see them in my living room
    !

  51. Dana Tucker says

    June 6, 2013 at 4:48 am

    Thanks Sandy!

  52. Doris Gagnon says

    September 27, 2013 at 2:49 am

    I love the kitchen ceiling tiles…Where can I purchase them? I have popcorn ceilings and I very much dislike them. Help!!!

  53. Joani says

    March 21, 2014 at 4:20 pm

    Beautiful. Wish you lived closer to Arizona. I love the ceiling.

  54. katy says

    June 20, 2015 at 11:40 am

    On the order page for the beautiful tile you used in your kitchen it gives choices of ‘white’? I read in your comments you reference regular white. At the very bottom of the order page is plain white. Do you happen to recall if that is it? Beautiful kitchen! Thank you for sharing!

  55. Dana Tucker says

    June 21, 2015 at 6:39 am

    Sorry, I don’t remember. I didn’t know there was more than one white. 🙂 Thanks for the comment.

  56. vera says

    April 17, 2017 at 5:53 am

    I’m wanting to redo the kitchen cabinets . The problem is I painted these around 12 yrs. or so ago over a dark stain . Painted them in a pretty color of off white . I’m wanting to know if one can paint over these with the Sloan paint . I’m not familiar with the Annie Sloan paint at all .
    With seeing your pictures of pictures I know for sure I would love having my cabinets the same color . But, as I said I’m not familiar with any of these paints you use .
    Would you please let me know which way to go with this ?
    Thank you so much .

  57. Dana Tucker says

    April 17, 2017 at 5:55 am

    You should be fine to paint over them. Annie Sloan is great for exactly this application. Best of luck to you!

Trackbacks

  1. Contact one of our installers says:
    March 31, 2012 at 12:34 pm

    […] their dream kitchen was our beautiful R-74 styrofoam decorative ceiling tile. They even wrote a blog post about it! Check out the great before, during, and after […]

  2. Kitchen Week: Bella Tucker | Fauxology says:
    July 17, 2012 at 12:19 am

    […] incredible DIY transformation with a lot of vision!  To read a more in-depth profile, Dana shared her own write-up on the Bella Tucker blog.  Dana and Brooks are based in Nashville, TN, and run Bella Tucker […]

  3. Annie Sloan Duck Egg Blue Painted Kitchen Cabinets | Bella Tucker Decorative Finishes | Faux Finish Painter Franklin TN says:
    April 29, 2013 at 3:29 pm

    […] Stepping outside the box, Brooks and I painted our own kitchen cabinets grey with a glazed finish on the door fronts. […]

  4. Painted Floors with Annie Sloan Chalk Paint | Bella Tucker Decorative Finishes | Faux Finish Painter Franklin TN says:
    June 4, 2013 at 7:19 am

    […] no disrespect to the previous owners. They were fantastic and actually sold us their house when I put a note in their mailbox and kind of asked them to. It’s just a basement bedroom. And basement bedrooms are well, […]

  5. Painting Kitchen Cabinets and brick lighten up a kitchen | Bella Tucker Decorative Finishes | Faux Finish Painter Franklin TN says:
    June 28, 2013 at 1:45 pm

    […] beautiful solid wood stained cabinets. In other cases, like in the house we recently purchased the cabinets need a major update. Everyone wants their kitchens to be light and bright like the current design magazines and blogs. […]

  6. Beach Room Makeover | Bella Tucker Decorative Finishes | Faux Finish Painter Franklin TN says:
    July 16, 2013 at 8:46 am

    […] in our new home for a year and a half and I am very happy with the progress we have made. We have updated our kitchen, painted our bathroom vanities, updated our stairs, our fireplace, and our basement bedroom. Next […]

  7. Have you considered Grey Kitchen Cabinets? | Bella Tucker Decorative Finishes | Faux Finish Painter Franklin TN says:
    December 28, 2013 at 10:55 am

    […] A few years ago I noticed a trend in the shelter magazines and the design blogs I was reading. Golds, beiges and tans were being replaced with whites, shades of grey, soft blues and greens. Around the same time we started to see a huge surge in requests for painted kitchen and bathroom cabinetry. When we painted our own kitchen cabinets, we chose a soft glazed grey. I get a couple of requests a week from people wanting information on how we painted our cabinets. You can read about that HERE. […]

  8. Repurposed Headboard Sign with Annie Sloan Chalk Paint says:
    June 14, 2014 at 11:00 am

    […] Annie Sloan Chalk Paint is great for furniture and cabinet makeovers. If you live in the Nashville, TN area and you would like to talk to us about your cabinet or furniture makeover, please contact us by filling out the form below. We would love to hear from you. […]

  9. White Painted Brick-Exterior Before and After - Bella Tucker Decorative Finishes says:
    August 5, 2014 at 12:42 pm

    […] we bought THIS HOUSE that wasn’t for sale 2 -1/2 years ago, Brooks kept saying how much he hated the exterior. It […]

  10. Ceiling Decorating Ideas (DIY Ideas To Add Interest To Your Ceiling) - Addicted 2 Decorating® says:
    October 14, 2015 at 8:05 am

    […] via Bella Tucker Decorative Finishes […]

  11. Bathroom Remodeling on a Budget - Bella Tucker Decorative Finishes says:
    December 8, 2015 at 10:17 am

    […] never forget the first night in our new home. I was so excited to be experiencing all the firsts in the new space. I went into the bathroom to […]

  12. Anatomy of a Kitchen Remodel- Week 1 - Bella Tucker Decorative Finishes says:
    February 28, 2018 at 8:16 am

    […] Want to read about our original kitchen makeover 6 1/2 years ago?? CLICK HERE […]

  13. Popcorn Ceiling Styrofoam Tiles- 5 Years Later - Bella Tucker Decorative Finishes says:
    July 30, 2018 at 11:29 am

    […] First on the list was an update to the kitchen. Luckily, the previous owners had installed granite countertops, we liked the layout of the kitchen, but the cabinets needed some work. Here's a post I wrote on our kitchen makeover five years ago. […]

Leave a Reply

Your email address will not be published. Required fields are marked *

This site uses Akismet to reduce spam. Learn how your comment data is processed.

Primary Sidebar

Looking For Something?

Let us handle your kitchen re-design. Call us today at 615-628-7373

Categories

Latest on Instagram

bellatucker

Want to see the other side of the kitchen I posted Want to see the other side of the kitchen I posted yesterday? We reworked the white cabinet into a concealed coffee bar. We wrapped it in stained walnut and added an aged mirror front. Definite style upgrade. 

Design @bellatucker 

📸 @lesliebrownphotography
Sometimes some small changes can make a BIG IMPACT Sometimes some small changes can make a BIG IMPACT. In this kitchen we replaced the range and hood, installed new counters and backsplash and painted the cabinets. Don’t miss the fabulous teacup chandelier. The perfect update for my fancy teacup loving chef client. 

Design @bellatucker 
đź“· by @lesliebrownphotography
What we do. We reimagine your kitchen. We make cha What we do. We reimagine your kitchen. We make changes to bring your existing kitchen up to date. Most times this includes modifying your existing cabinets, new countertops, new tile, new lighting and appliances. It almost always includes painting your cabinets. Did you know we started as a cabinet painting company and that is still a thriving part of our business. If you need any or all of the above we would love to chat. Designers, we would love to talk to you if you have a client who needs kitchen cabinet painting. Please reach out. 

đź“· @geinger
Home ❤️ Home ❤️
Wallpaper Wednesday ❤️❤️❤️ Design @be Wallpaper Wednesday ❤️❤️❤️

Design @bellatucker 
📸 @lesliebrownphotography
For me, kitchen design always starts with sink pla For me, kitchen design always starts with sink placement. Whenever possible I always like to place the sink under a window. Also, whenever possible I love to open up the windows as wide and tall as I can. Nothing adds more to the design of a kitchen than natural light. Start there and the rest flows into place. 

Design @bellatucker 

đź“· @lesliebrownphotography
Happy February!! Is it time to give your kitchen s Happy February!! Is it time to give your kitchen some love? Check out my website for more information on my services! 

After 📸 @lesliebrownphotography
Every kitchen needs a focal point. I’m always lo Every kitchen needs a focal point. I’m always looking for that “wow” moment in a kitchen. Here I think we achieved it with this mirrored dish cabinet. Swipe for before. 

Design by @bellatucker 

📸 by @lesliebrownphotography
Want to see the other side of the kitchen I posted Want to see the other side of the kitchen I posted yesterday? Swipe for the before. Major transformation! 

Design by @bellatucker 

đź“· by @lesliebrownphotography
Do you have room in your existing kitchen for a be Do you have room in your existing kitchen for a beverage bar or a coffee bar? You just might if you have one of these (swipe) these built in kitchen desks were all the rage in the 90’s and early 2000’s. What we found is that they are rarely used and become the drop zone for mail and clutter. If you have one of these desks (swipe) you could have the coffee/beverage bar of your dreams. Dream with us! 

Design @bellatucker 

đź“· @lesliebrownphotography
Capturing all of the angles of this island! This i Capturing all of the angles of this island! This is definitely a focal point in this kitchen! 

Design @bellatucker 

📸 @lesliebrownphotography
Spaces for entertaining were a hit this year! Chec Spaces for entertaining were a hit this year! Check out this moody lounge! 

Design @bellatucker 

After 📸 @lesliebrownphotography
Wrapping up 2022 with some of my favorite designs Wrapping up 2022 with some of my favorite designs from the year!

Design @bellatucker 

📸 @lesliebrownphotography
I’m dreaming of a white... kitchen!!!! Connectin I’m dreaming of a white... kitchen!!!! Connecting the kitchen to the living room changed the entire dynamic within this home! 

Design @bellatucker 

After 📸 @lesliebrownphotography
Finally posted all the details and before photos o Finally posted all the details and before photos of our Modern Cottage Kitchen Remodel. This one is such a huge transformation. If you want to check it out look for the link in profile and click “blog”. Swipe for a sneak of the before. 

Design @bellatucker 

📸 @lesliebrownphotography 

GC Glen Hutchison
Christmas at the Tuckers. 🎄 Christmas at the Tuckers. 🎄
As far as huge transformations go, this might be t As far as huge transformations go, this might be the biggest one I’ve ever worked on. Swipe to see the before from the same angle. We removed the wall on the left which opened up the kitchen to the family room. Prepare to see more of this transformation headed your way. 

Design by @bellatucker 
đź“· by @lesliebrownphotography 
GC Glen Hutchison
Laughing so hard at ourselves. We look like the co Laughing so hard at ourselves. We look like the couple from green acres. Every night we let the chickens out for about an hour to free range. It’s so cold here that I’m grabbing my faux fur. Brooks is suited up like farmer Ted. He does all the real farm work. I just pretend.
Photo shoot day. Prepare to see this amazing cotta Photo shoot day. Prepare to see this amazing cottage kitchen I’ll be sharing til the end of time. For a before and after video walkthrough check out my stories. Reels coming soon. ❤️
Shopping for a new refrigerator? The biggest upgra Shopping for a new refrigerator? The biggest upgrade you can make in that space is to NOT get ice and water in the door. A refrigerator is so much cleaner looking without it. And if possible, adding cabinetry panels to your refrigerator is a complete style upgrade. Just order your fridge “panel ready”. A good  carpenter can guide you through completing that look. 

Design @bellatucker 
📸 @lesliebrownphotography
Load More Follow on Instagram
Bella Tucker

Nashville TN Cabinet Painting| Kitchen Remodeling| Kitchen Design| Call 615-628-7373 All content Copyrighted by Bella Tucker Decorative Finishes 2020

By Dana Tucker | Bella Tucker | [email protected] | Real Estate Websites